📦 Request Quote
📞 Connect with us
Avoid common coarse thread drywall screw mistakes involving wrong screw length, missed wooden studs, poor spacing, overdriving, timber splitting, damaged paper and screw pops
Learn the 10 most common mistakes when installing coarse-thread drywall screws into wooden studs, including incorrect screw length, missed studs, overdriving, and poor fastening techniques.

10 Mistakes to Avoid When Using Coarse-Thread Drywall Screws on Wooden Studs
After completing a wooden-stud drywall project, a contractor notices several unexpected problems.
Some coarse-thread drywall screws keep spinning without tightening. A few screw heads remain above the gypsum-board surface, while other screws have been driven too deeply and torn the paper facing. Small cracks appear near the edges of certain wooden studs, and several screw heads become visible after finishing.
The contractor initially suspects a product-quality problem. However, a detailed site inspection shows that the screws are not the main cause.
The actual problems include incorrect screw length, missed wooden studs, poor screw spacing, unsuitable driving depth, wet timber and finishing over defective fixings.
This guide explains ten common coarse thread drywall screw mistakes and shows how contractors, installers and buyers can prevent loose gypsum boards, spinning screws, split timber, damaged paper and drywall screw pops.
Important: Screw length, penetration, fixing centres and installation requirements can vary between wall, ceiling, acoustic and fire-rated systems. Always follow the approved system specification and board manufacturer’s instructions.
Quick Answer
Most coarse-thread drywall screw installation mistakes happen because the installer does not confirm one or more of the following before starting:
• Framing material
• Board thickness
• Number of board layers
• Required screw length
• Timber condition
• Wall or ceiling application
• Approved screw spacing
• Correct driving depth
• Position of concealed services
• Final inspection requirements
Coarse-thread drywall screws are commonly selected for suitable wooden studs because their wider, deeper threads engage timber fibres effectively. However, even the correct screw can fail to perform properly when it is installed incorrectly.
For a complete product-selection overview, read the Coarse-Thread Drywall Screws for Wooden Studs guide.
Mistake 1: Using the Wrong Thread Type
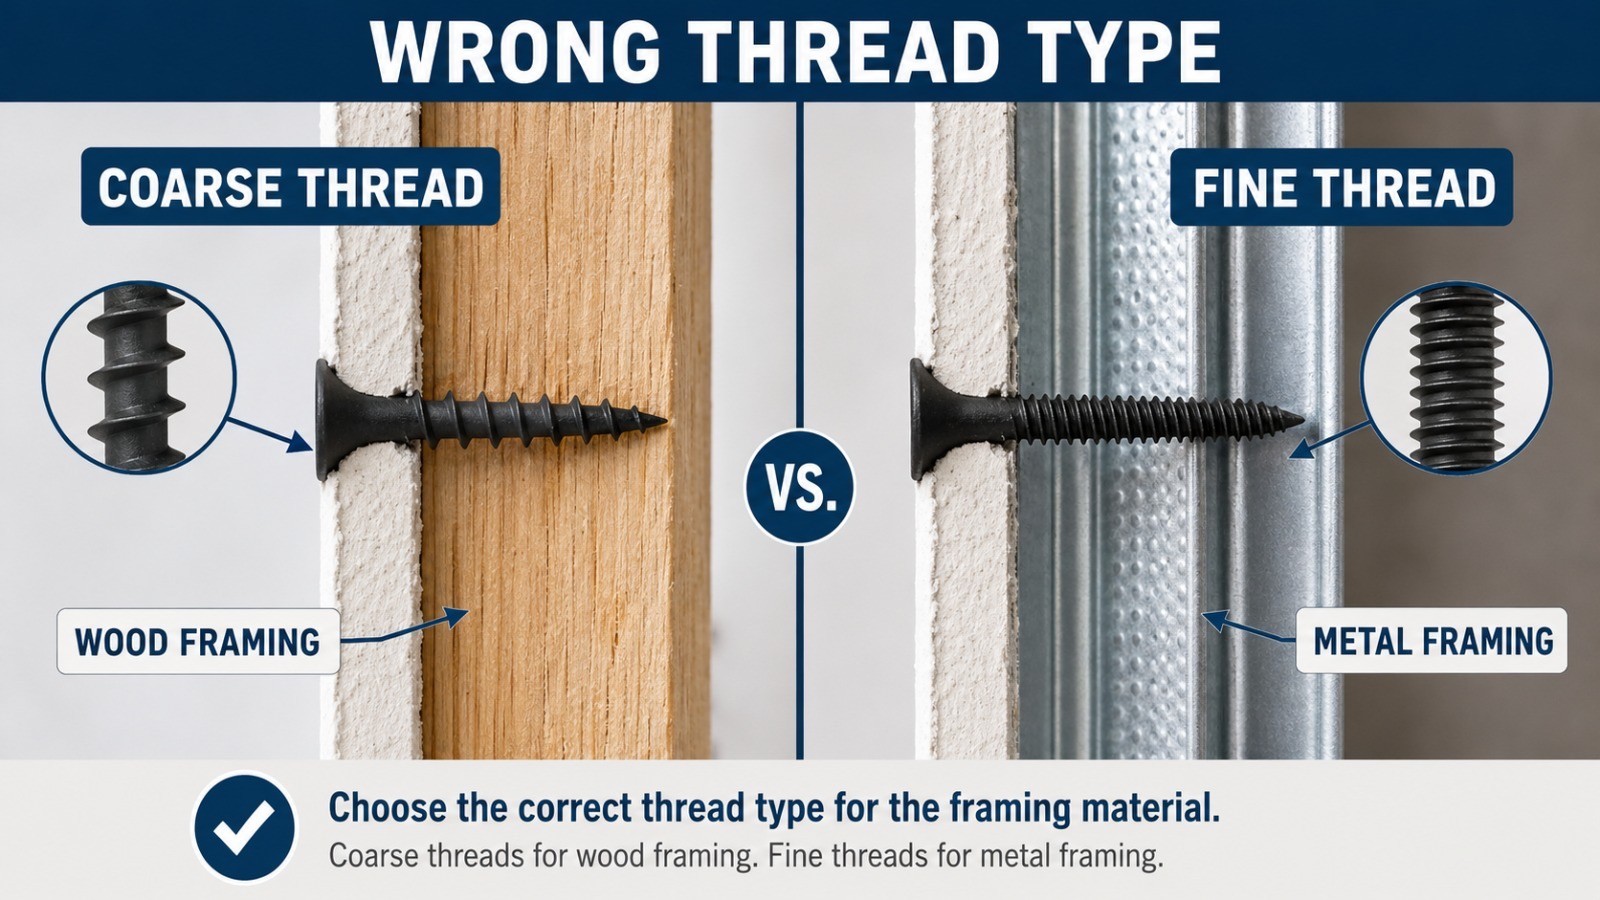
One of the most common drywall screw installation mistakes is selecting a screw based only on its colour or overall appearance.
A contractor may see a black drywall screw and assume it can be used with any framing material. However, screw finish and thread pattern are different characteristics.
Coarse-thread drywall screws are generally used with suitable wooden framing. Fine-thread drywall screws are normally selected for compatible light-gauge metal framing.
Why this mistake happens
The installer may:
• Check only the screw colour
• Ignore the framing material
• Assume all black drywall screws are identical
• Use leftover screws from another project
• Purchase screws without reviewing the specification
Problems caused by the wrong thread type
Using an unsuitable thread pattern may lead to:
• Weak grip
• Spinning screws
• Stripped fixing points
• Loose board edges
• Increased installation time
• Inconsistent holding performance
How to avoid it
Before opening the screw packaging, confirm:
1. Is the framing wood or metal?
2. Is the screw thread suitable for that framing?
3. Does the project specification approve the selected fastener?
4. Does the screw length match the board build-up?
Do not choose a screw based only on colour, coating or packaging.
Link the text fine-thread vs coarse-thread drywall screws to your thread-comparison guide.
Mistake 2: Choosing the Wrong Drywall Screw Length
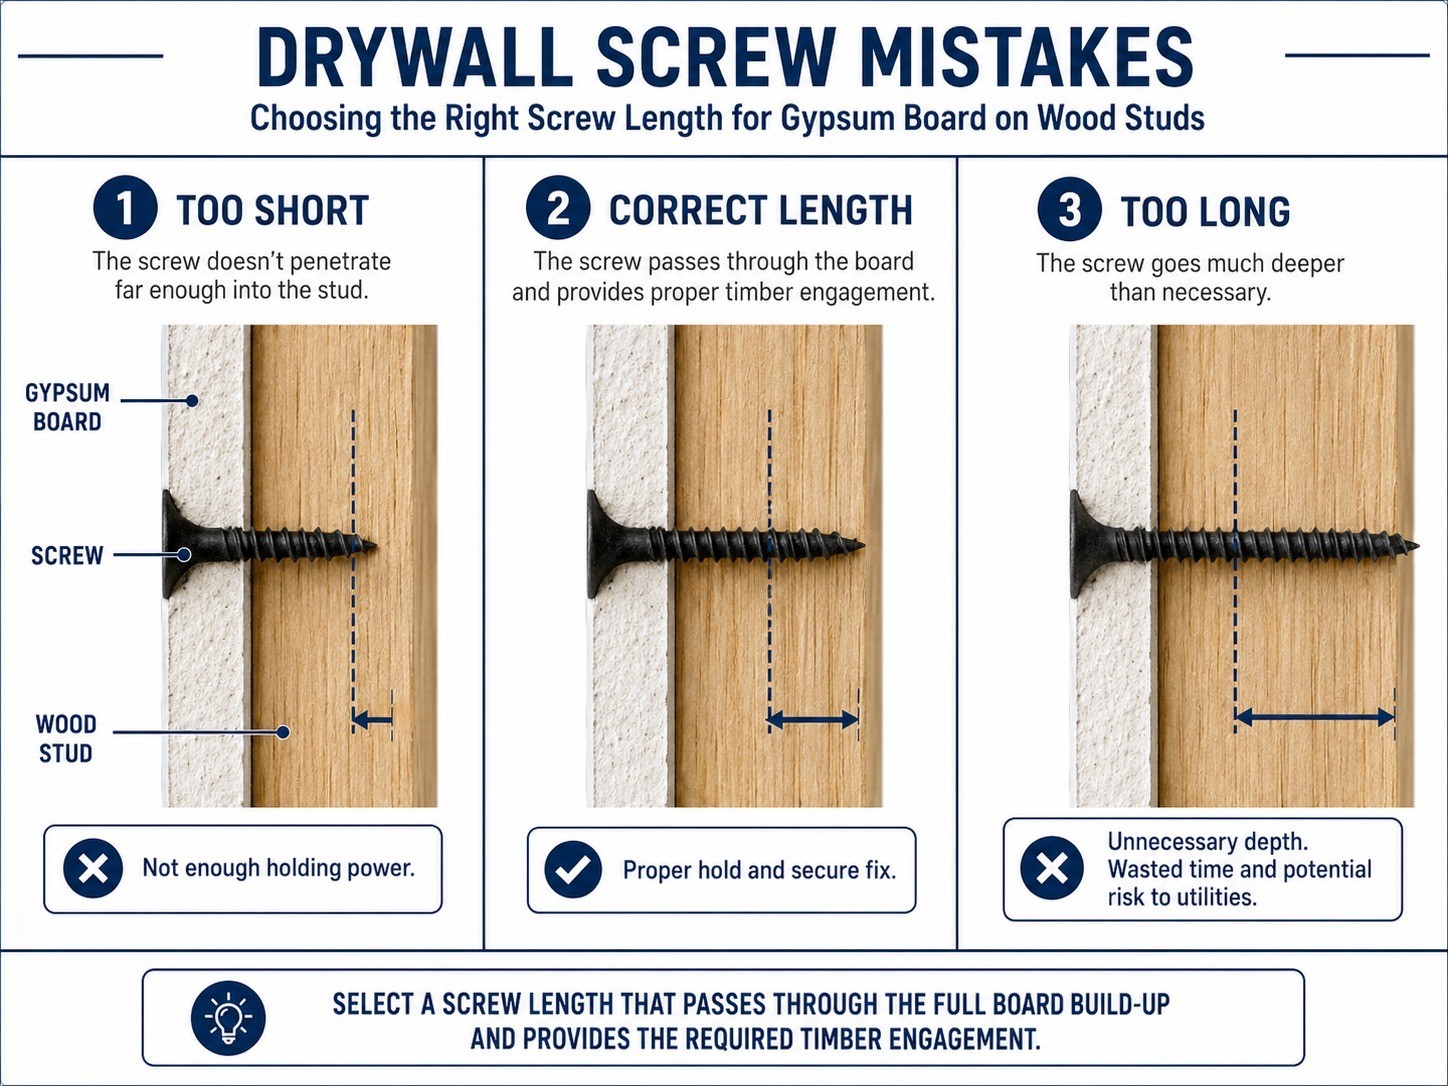
Selecting the wrong drywall screw length is one of the most serious coarse drywall screw problems.
The screw must pass through the complete gypsum-board build-up and achieve the timber engagement required by the approved system.
Board thickness alone does not always determine the final screw length.
The installer must also consider:
• Number of board layers
• Intermediate channels or components
• Required penetration into the wooden stud
• Wall or ceiling application
• Concealed electrical or plumbing services
• System-specific fixing requirements
What happens when the screw is too short?
A short screw may barely reach the timber or may not reach it at all.
Possible results include:
• Spinning drywall screws
• Loose gypsum board
• Weak board edges
• Movement during finishing
• Screw pops later
• Rework after inspection
What happens when the screw is too long?
An unnecessarily long screw may:
• Be harder to control
• Increase installation time
• Increase material cost
• Raise the risk of contacting concealed services
• Fail to match the approved system
Single-layer and double-layer mistake
A common error is using the same screw for both layers of a double-layer partition.
A screw suitable for the first layer may be too short for the second layer because the outer-layer fastener must pass through the complete board build-up before engaging the wooden stud.
How to avoid it
Calculate the required length using:
Total board build-up + required timber engagement
Then choose the shortest suitable screw length that meets the approved requirement.
Mistake 3: Missing the Wooden Stud
A drywall screw can appear to enter the board correctly while completely missing the timber behind it.
When this happens, the screw may spin continuously because it is only passing through the gypsum board.
This is one of the most common causes of spinning drywall screws.
Signs that the screw missed the stud
• The screw keeps turning without tightening
• The board is not pulled firmly against the framing
• The screw head moves when pressed
• The screw feels loose after installation
• A gap remains behind the gypsum board
Why screws miss wooden studs
Possible causes include:
• Incorrect stud markings
• Misaligned boards
• Driving at an angle
• Narrow timber framing
• Poor visibility
• Rushing during installation
• Reusing an incorrect fixing line
Why this is a problem
A screw that misses the stud does not create a reliable board-to-frame connection.
Even when it appears acceptable before finishing, it may later contribute to:
• Loose board areas
• Cracking around joints
• Visible screw heads
• Movement under pressure
• Additional repair work
How to correct it
Remove the loose screw and identify the exact stud position.
Install a suitable replacement screw in an approved nearby location, keeping enough distance from the damaged hole and board edge.
Do not leave the spinning screw in place and cover it with joint compound.
Mistake 4: Overdriving the Screw

An overdriven drywall screw is driven too deeply into the board.
Instead of sitting slightly below the surface, the screw head breaks through the paper facing and enters the softer gypsum core.
This is one of the most damaging coarse-thread drywall screw installation mistakes.
Why the paper facing matters
The paper surface helps support the bugle-shaped screw head.
When the paper tears badly:
• The screw head loses surface support
• The fixing point may weaken
• The board may move around the screw
• A corrective fixing may be required
• Finishing defects may develop later
Common causes of overdriving
• Driver setting is too aggressive
• Excessive pressure is applied
• Installer drives too quickly
• Worn or unsuitable driver bit is used
• Board is not held firmly against the framing
• Installer continues driving after the screw is seated
Correct drywall screw driving depth
The screw head should sit slightly below the gypsum-board surface without tearing the paper facing.
The head should create a small recess suitable for joint compound while keeping the surrounding paper intact.
How to avoid overdriven drywall screws
• Use a depth-control attachment where appropriate
• Set the driver correctly
• Drive perpendicular to the board
• Slow down as the head approaches the surface
• Inspect the paper around every fixing
• Replace defective fixings before finishing
Internal-link opportunity: Link correct drywall screw driving depth to your driving-depth guide.
Mistake 5: Underdriving the Screw
An underdriven screw remains above the gypsum-board surface.
It may still engage the wooden stud, but the raised head interferes with finishing and may prevent the board from being properly secured.
Signs of an underdriven drywall screw
• Screw head remains visible above the board
• A finishing tool catches on the head
• Joint compound cannot be applied smoothly
• The board is not pulled tightly against the framing
• The screw can still be tightened further
Problems caused by underdriving
Underdriven drywall screws may result in:
• Visible high spots
• Uneven joint compound
• Raised screw heads after painting
• Poor board contact
• Cracking around the fixing
• Additional sanding and repair
Why underdriving happens
• Screw is too long or difficult to control
• Driver power is insufficient
• Installer stops too early
• Screw enters dense or damaged timber
• Driver bit slips
• Screw is installed at an angle
How to avoid it
Drive the screw until the bugle head is slightly below the board surface, but stop before the paper tears.
If the screw cannot be seated correctly, remove it and inspect:
• Screw length
• Timber condition
• Screw alignment
• Driver bit
• Framing position
Do not force a screw that is not entering normally.
Mistake 6: Using Incorrect Drywall Screw Spacing
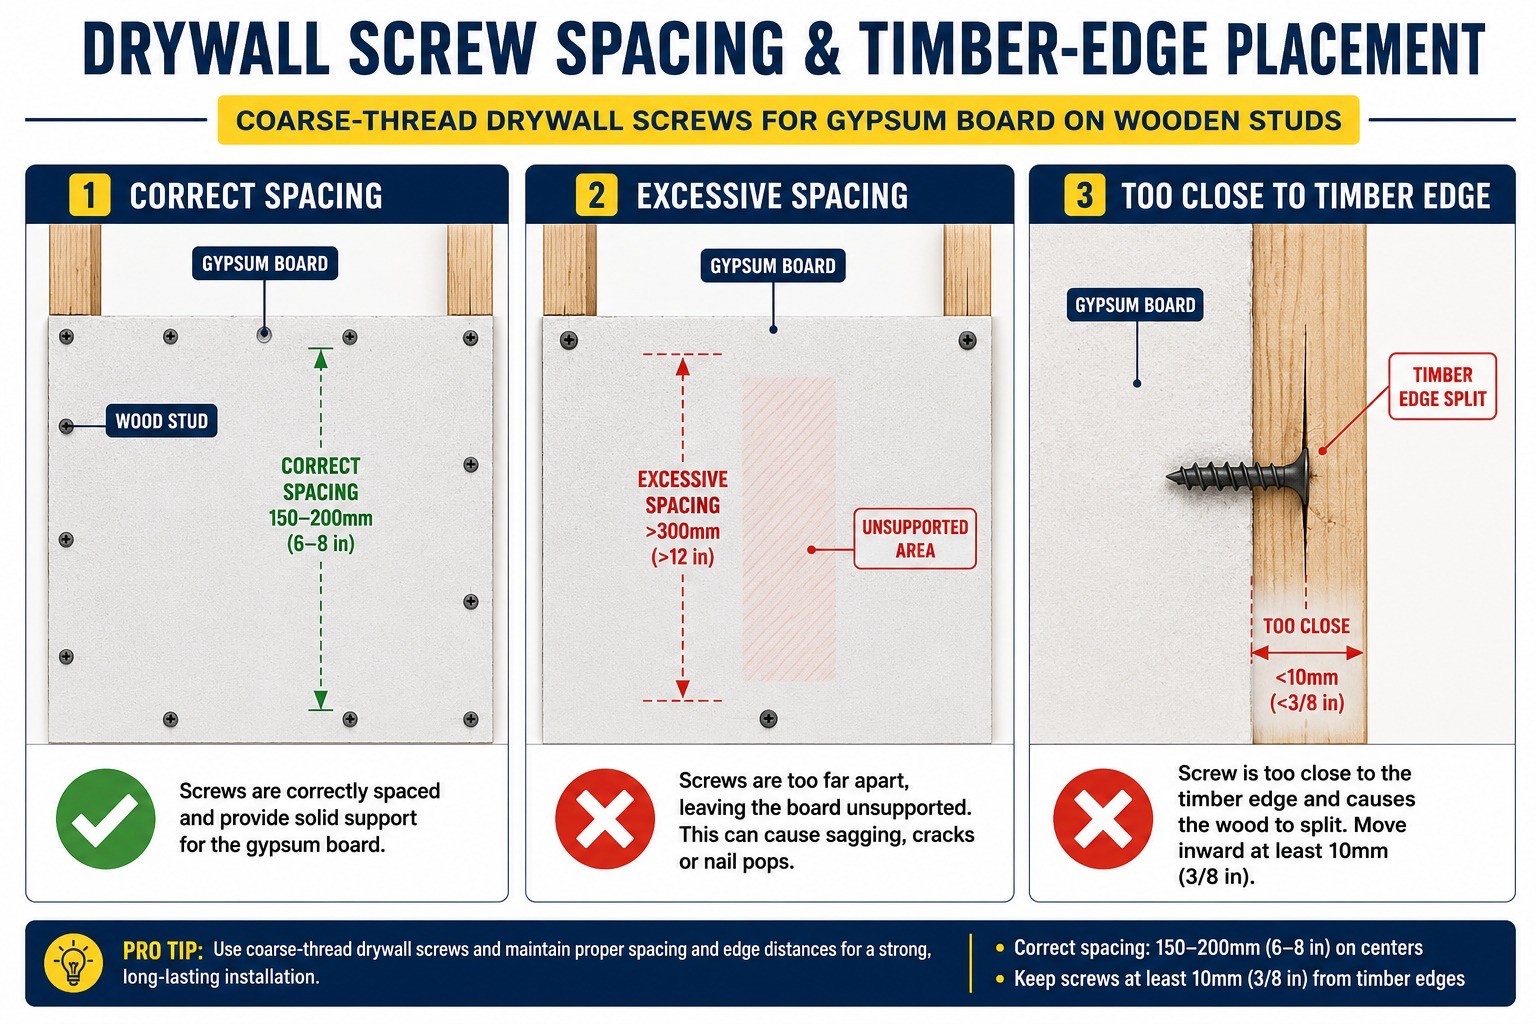
Incorrect drywall screw spacing can allow the board to move between fixing points.
Spacing that is too wide may reduce support, while unnecessary over-fixing can increase installation time and the number of damaged fixing points.
Why spacing errors happen
Installers may:
• Guess the fixing centres
• Copy spacing from another project
• Use one rule for every board thickness
• Ignore the difference between walls and ceilings
• Increase spacing to save screws
• Add extra screws without checking the system
Problems caused by excessive spacing
• Board movement
• Loose edges
• Joint cracking
• Sagging in ceiling applications
• Uneven surfaces
• Increased risk of screw pops
Problems caused by unnecessary over-fixing
Adding more screws is not always better.
Too many screws may:
• Increase paper damage
• Increase installation time
• Create more defective fixing points
• Cause timber splitting in narrow framing
• Increase material usage without improving performance
How to avoid spacing mistakes
Follow the fixing pattern specified for the approved wall or ceiling system.
Confirm:
• Board thickness
• Board orientation
• Stud or joist spacing
• Wall or ceiling application
• Board-edge fixing requirements
• Field fixing requirements
• Single-layer or multi-layer assembly
Do not rely on one universal spacing value.
Mistake 7: Driving Screws Too Close to Timber Edges
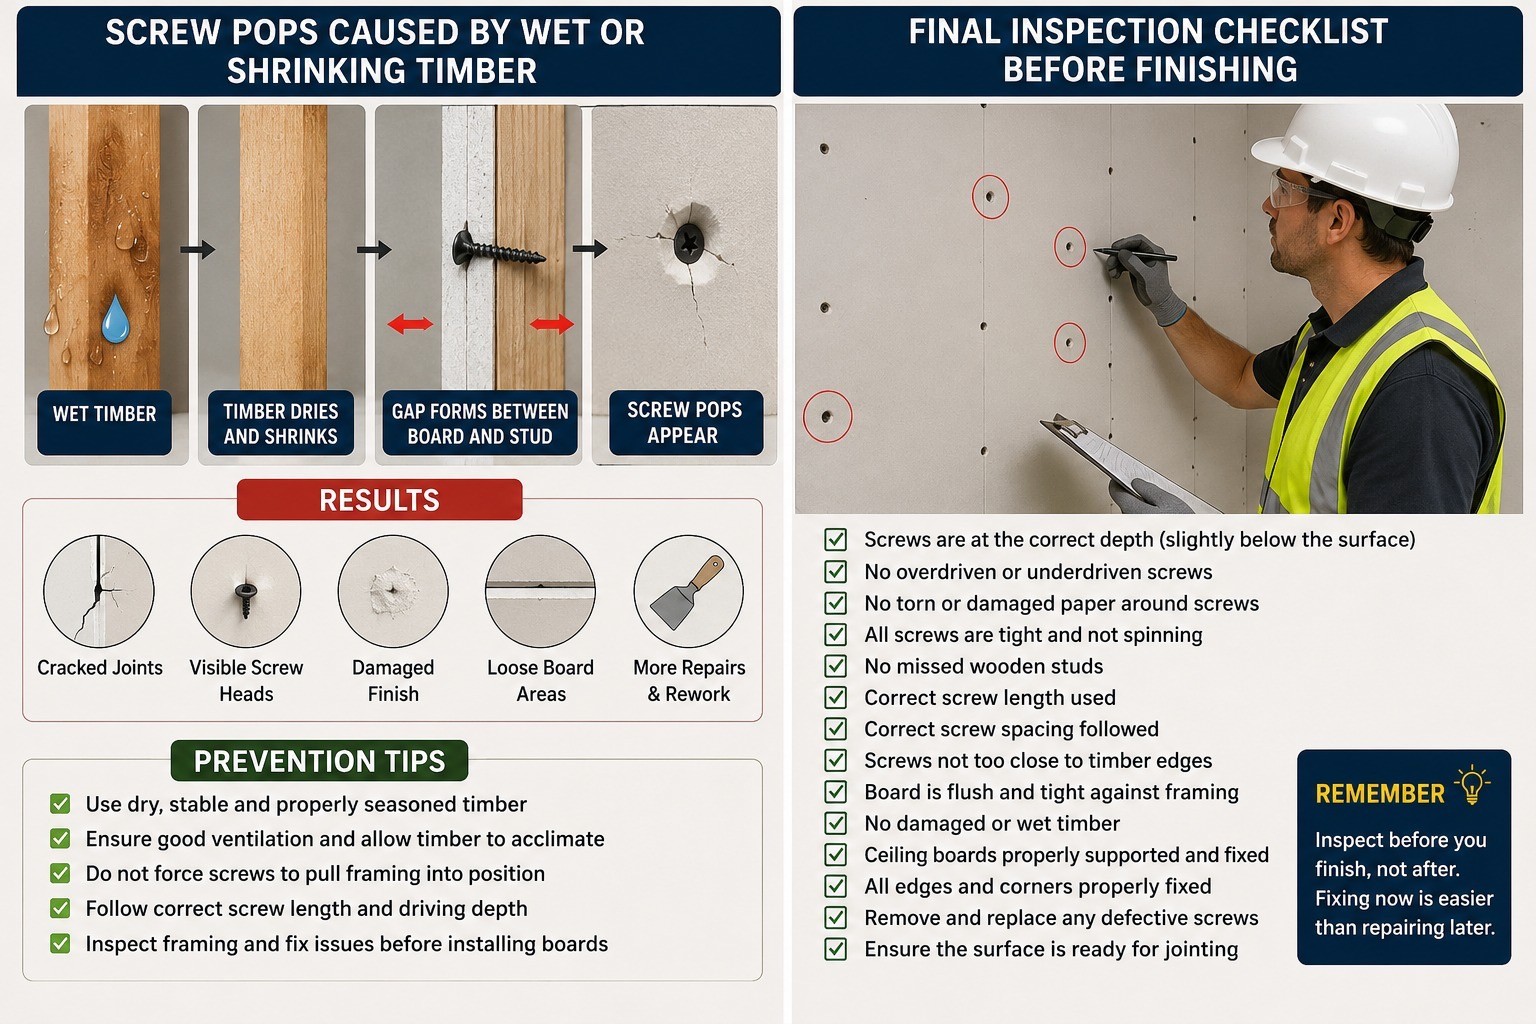
Coarse-thread drywall screws have deep threads that engage wood fibres strongly. However, driving them too close to a timber edge can contribute to splitting.
Why timber splitting happens
The risk may increase when:
• The screw is placed close to the stud edge
• Timber is already cracked
• The framing is narrow
• Several screws are installed in one small area
• The timber is unusually dry or dense
• The screw is driven at high speed
• A damaged fixing hole is reused
Why split timber is a problem
A split wooden stud may provide reduced holding around the screw.
It can also result in:
• Loose fixings
• Reduced edge support
• Continued cracking
• Board movement
• Difficulty installing replacement screws
• Additional framing repair
How to prevent timber splitting from drywall screws
• Keep screws centred on the stud
• Avoid damaged timber edges
• Do not cluster screws unnecessarily
• Inspect framing before boarding
• Reduce excessive driving speed
• Do not force the screw into dense timber
• Follow any approved preparation requirements
Softwood and hardwood considerations
Coarse-thread screws are commonly used with suitable softwood studs, but timber condition still matters.
Dense hardwood or engineered timber may require additional confirmation from the relevant system or timber manufacturer.
Do not assume every wooden product can use the same fastener and installation method.
Mistake 8: Installing Gypsum Board Over Wet or Damaged Timber
Wet, twisted, split or unstable timber can create drywall problems even when the correct screws are used.
This is why some apparent coarse drywall screw problems are actually framing problems.
Wet timber and screw pops
Timber may shrink as its moisture content changes.
As the timber dries, movement can develop between:
• The wooden stud
• Gypsum board
• Screw head
• Joint compound
• Finished surface
This movement may contribute to drywall screw pops in timber framing.
Damaged timber problems
A screw driven into damaged timber may:
• Spin without tightening
• Enter a cracked section
• Fail to pull the board tight
• Lose grip later
• Create an unreliable fixing point
What should be inspected before boarding?
Check the timber for:
• Excessive moisture
• Cracks
• Splits
• Twisting
• Bowing
• Loose connections
• Damaged edges
• Old fixing holes
• Incorrect alignment
How to avoid the mistake
Do not use the drywall screws to pull badly aligned framing into position.
Correct the framing first. The board should sit against a stable, aligned and suitable timber structure before fastening begins.
Mistake 9: Using the Same Installation Rule for Walls and Ceilings
A fixing pattern suitable for a wooden-stud wall should not automatically be copied to a timber-framed ceiling.
Ceiling boards are installed overhead and remain subject to gravity. Their support, fixing pattern and screw spacing may therefore differ from wall requirements.
Common ceiling installation mistakes
• Using wall spacing on the ceiling
• Using the wrong screw length
• Failing to support the board during installation
• Leaving gaps between board and framing
• Missing ceiling joists or battens
• Using damaged timber
• Ignoring board orientation requirements
Why ceiling mistakes are serious
Poorly supported ceiling boards may show:
• Movement between joists
• Sagging
• Joint cracking
• Visible screw heads
• Loose edges
• Increased finishing defects
How to avoid the mistake
Before installing drywall screws for timber ceilings, confirm:
• Board thickness
• Joist or batten arrangement
• Approved screw length
• Required fixing centres
• Board orientation
• Edge and field fixing pattern
• Temporary board support
• Multi-layer requirements
Never assume wall and ceiling systems use identical fixing rules.
Mistake 10: Finishing Before Inspecting the Fixings
The final common mistake is applying joint compound before checking every fixing.
Once the screws are covered, simple installation defects become more difficult to identify and repair.
What should be checked before finishing?
Inspect the complete installation for:
• Underdriven screws
• Overdriven screws
• Torn paper
• Spinning screws
• Missed studs
• Loose board areas
• Split timber
• Incorrect spacing
• Protruding screw heads
• Damaged board edges
• Missing fasteners
• Gaps between board and framing
Why early inspection matters
Correcting a defective fixing before finishing is normally easier than repairing:
• Cracked compound
• Visible screw heads
• Loose board sections
• Repeated screw pops
• Damaged paint
• Finished wall defects
Corrective approach
A defective screw should not simply be covered.
Depending on the issue, the installer may need to:
1. Remove the defective screw.
2. Inspect the board and timber.
3. Correct the board contact.
4. Install a suitable replacement nearby.
5. Confirm the correct depth.
6. Repair the damaged surface.
7. Reinspect before applying compound.
Drywall Screw Troubleshooting Table
Problem | Possible cause | Recommended check |
Screw keeps spinning | Missed stud, short screw or damaged timber | Confirm stud position, length and timber condition |
Screw head remains above surface | Underdriven screw or poor board contact | Check depth, alignment and framing contact |
Paper tears around screw | Overdriving or excessive pressure | Adjust driver setting and install corrective fixing |
Board moves after fastening | Wrong spacing, missed studs or loose framing | Review fixing pattern and framing alignment |
Timber cracks near screw | Screw too close to edge or damaged timber | Move fixing position and inspect framing |
Screw heads appear after finishing | Timber movement, poor depth or loose board | Inspect framing moisture, board contact and fixings |
Ceiling board shows movement | Wall spacing copied to ceiling | Confirm approved ceiling fixing pattern |
Outer layer feels loose | Screw too short for double-layer build-up | Recalculate total board thickness and penetration |
Screw will not seat correctly | Dense timber, damaged thread or angled driving | Inspect screw, timber and driver alignment |
Repeated repair failures | Underlying framing or system problem | Review the complete installation rather than one screw |
Installer Checklist
Before installing drywall screws for wooden studs, confirm the following:
• Framing material is wood
• Thread type is suitable for timber
• Board thickness is known
• Number of board layers is confirmed
• Correct coarse-thread screw size is selected
• Required timber engagement is known
• Wall and ceiling requirements are separated
• Stud and joist positions are marked
• Concealed services are identified
• Timber is dry and stable
• Framing is straight and secure
• Fixing centres are confirmed
• Driver setting is tested
• Board is held firmly against the framing
• Screw heads are slightly below the surface
• Paper facing remains intact
• Defective screws are corrected
• Final inspection is completed before finishing
Buyer Checklist for Coarse-Thread Drywall Screws
Before purchasing coarse drywall screws, confirm:
• Intended application
• Wooden-stud or timber-batten system
• Board thickness
• Single-layer or double-layer construction
• Required screw lengths
• Thread type
• Head type
• Drive type
• Finish or coating
• Packaging quantity
• Project delivery schedule
• Storage conditions
• Wall and ceiling quantities
• Approved product specification
For projects containing different board build-ups, a mixed-size order may be more practical than purchasing one screw length for the entire site.
Conclusion
Many apparent product failures are actually coarse thread drywall screw mistakes caused by incorrect selection, unsuitable framing or poor installation.
The ten most important mistakes to avoid are:
1. Using the wrong thread type
2. Selecting the wrong screw length
3. Missing the wooden stud
4. Overdriving the screw
5. Underdriving the screw
6. Using incorrect screw spacing
7. Driving too close to timber edges
8. Installing over wet or damaged timber
9. Using the same rules for walls and ceilings
10. Finishing before inspecting the fixings
Correct coarse-thread drywall screw installation begins with confirming the framing material and complete board build-up.
The installer must then select the correct screw length, follow the approved fixing pattern, drive every screw to the proper depth and inspect all fixings before finishing.
Following these steps can help reduce spinning screws, loose gypsum boards, split timber, damaged paper, ceiling movement, visible screw heads and drywall screw pops.
For suitable sizes, finishes, packaging options or bulk supply, explore the Screwbee product range or contact the Screwbee team with your project requirements.
💬 Still Looking for the Right Drywall Screw Manufacturer?
Whether you're sourcing Drywall Screws zinc, Drywall Screws Black Zinc, or planning your next bulk purchase, Screwbee is ready to support your business with precision manufacturing, reliable quality, and dependable supply.
🟨 Request Bulk Quote
📘 Download Product Catalogue
📞 Contact Us Today
Partner with a Trusted Drywall Screw Manufacturer
Choosing the right drywall screw manufacturer is an investment in quality, consistency, and long-term business success. Whether you're a wholesaler, distributor, contractor, retailer, or procurement manager, partnering with an experienced manufacturer ensures dependable product quality, reliable supply, and professional support for every project.
At Screwbee, we are committed to manufacturing Drywall Screws Zinc and Black Zinc Drywall Screws that meet the demands of modern construction. From precision manufacturing and strict quality inspection to bulk production and customer-focused service, every stage of our process is dedicated to delivering fastening solutions you can rely on.
If you're looking for a trusted drywall screw manufacturer, a reliable drywall screw manufacturer in India, or a long-term partner for wholesale drywall screws and bulk drywall screw supply, Screwbee is ready to support your business with quality products and dependable manufacturing expertise.
Whether your requirement is for residential construction, commercial projects, building material distribution, or large-scale procurement, our team is ready to help you find the right drywall fastening solution for your specific needs.
🚀 Ready to Source Premium Drywall Screws?
Let's Build Stronger Projects Together.
Choose a trusted drywall screw manufacturer committed to precision, consistency, and customer satisfaction.
🟨 Request Bulk Quote
Receive a customized quotation for your bulk drywall screw requirements.
📘 Download Product Catalogue
Explore our complete range of premium drywall screw solutions.
📞 Talk to Our Sales Team
Discuss your project requirements with our product specialists.
📦 Explore Our Products
Discover our Drywall Screws Zinc and Drywall Screws Black Zinc.
⭐ Why Choose Screwbee?
✔ Trusted Drywall Screw Manufacturer
✔ PremiumDrywall Screws Zinc
✔ Premium Black Zinc Drywall Screws
✔ Precision Manufacturing
✔ Strict Quality Inspection
✔ Bulk Manufacturing Capability
✔ Reliable Customer Support
✔ Manufactured in India
✔ Wholesale & Bulk Supply
✔ Long-Term Business Partnership
📞 Contact Screwbee Today
Whether you're planning your next construction project or searching for a dependable drywall screw manufacturer, our team is here to help. Contact Screwbee today to discuss your requirements, request a quotation, or learn more about our premium drywall screw solutions.
Related Resources
Continue exploring our premium drywall screw solutions and manufacturing expertise.
📚 Related Pages
🔩 Wholesale Drywall Screws
Bulk drywall screw solutions for wholesalers, distributors, contractors, and construction companies.
🟨 Explore Wholesale Drywall Screws →
🔩 Drywall Screw Manufacturer in India
Learn why businesses across India and international markets choose Screwbee as their trusted manufacturing partner.
🔩Drywall Screw Zinc
Discover our Drywall Screws zinc engineered for dependable fastening performance.
🔩 Drywall Screws Black Zinc
Explore our Black Zinc Drywall Screws designed for reliable performance and long-lasting durability.
🏭 About Screwbee
Learn about our manufacturing process, quality standards, and commitment to excellence.
📞 Contact Screwbee
Speak with our sales team and request a quotation for your next project.
📞 Ready to Work with a Trusted Drywall Screw Manufacturer?
Whether you're sourcing drywall screws for wholesale distribution, commercial construction, or long-term procurement, Screwbee is ready to support your business with premium manufacturing, consistent quality, and dependable supply.