📦 Request Quote
📞 Connect with us
Learn drywall screw spacing for walls, ceilings, sheetrock, board edges and framing. See what to check for wood and metal studs and avoid common fixing mistakes.
A practical guide to drywall screw spacing, fixing patterns, and installation tips for walls and ceilings.

Drywall Screw Spacing for Walls and Ceilings:
Complete Guide
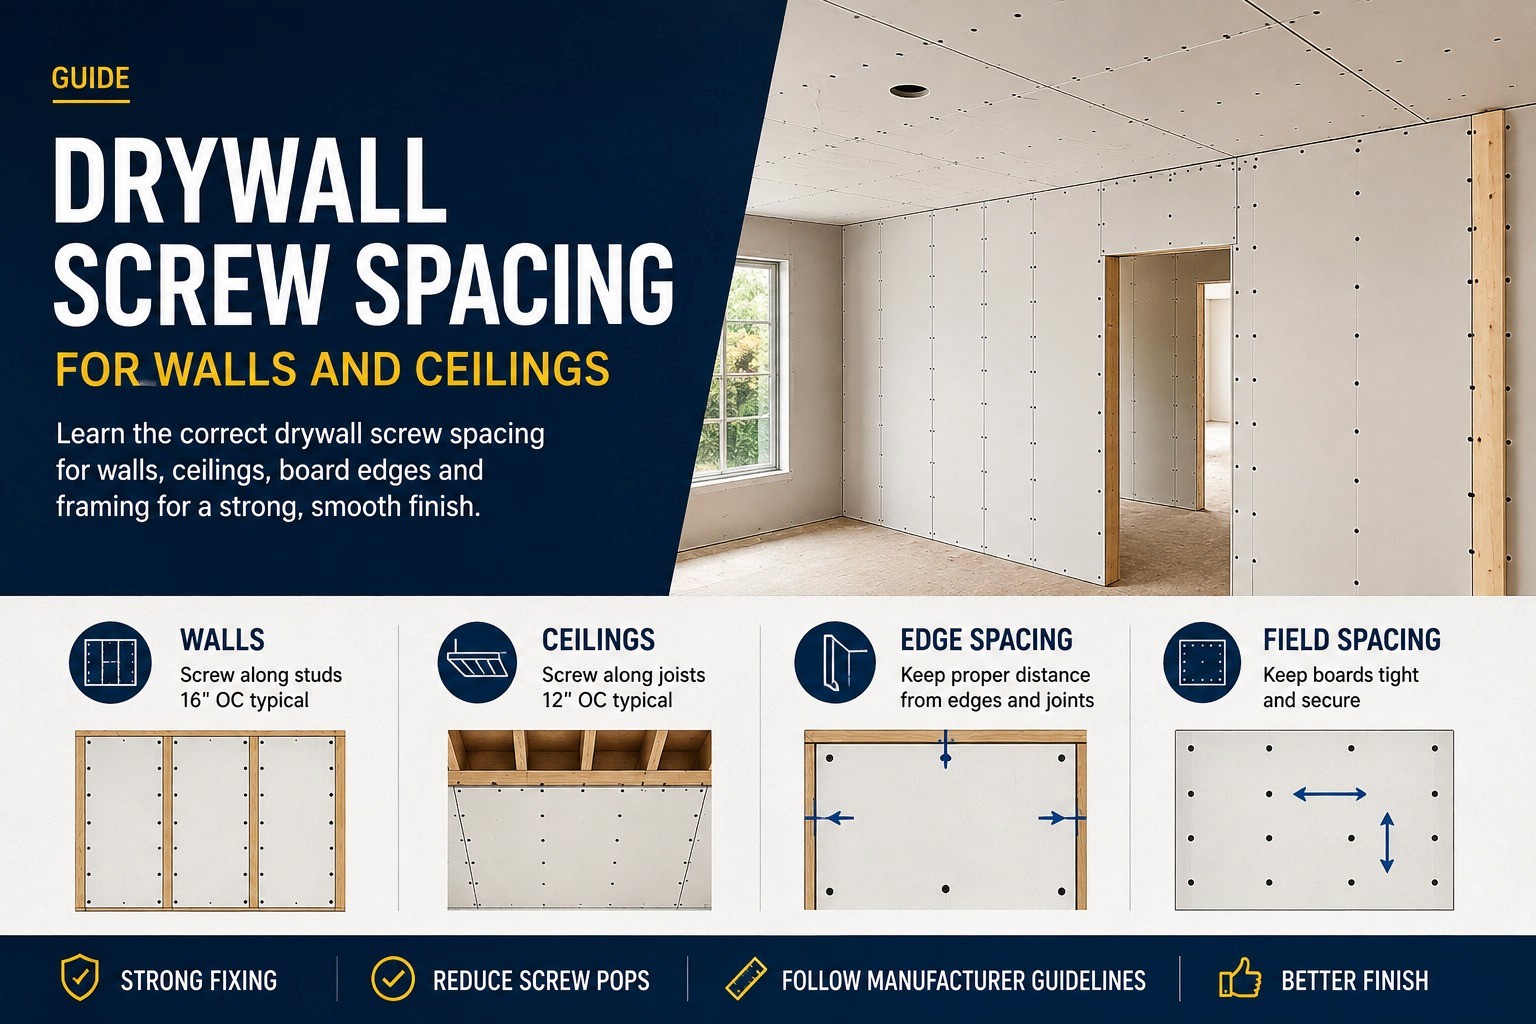
Drywall screw spacing depends on whether the board is installed on a wall or ceiling, the framing type, board thickness and the approved gypsum-board system. Ceiling screw spacing may differ from wall spacing, so always confirm the board manufacturer's fixing requirements before installation.
The same planning principles also apply when users search for sheetrock screw spacing, since the correct fixing pattern still depends on the board system, framing and installation requirements.
However, there is no single screw-spacing measurement suitable for every drywall project. The correct fixing pattern depends on the wall or ceiling system, board type, board thickness, framing material, board orientation and applicable installation requirements.
This guide explains how to plan drywall screw spacing for walls and ceilings, how edge fixing differs from field fixing, and which installation mistakes should be avoided.
Quick Answer: How Far Apart Should Drywall Screws Be?
Drywall screws should be installed at the fixing centres stated in the approved gypsum-board system, project specification or board manufacturer’s instructions.
Ceiling boards may require closer or differently arranged fixings than wall boards because they remain overhead and can be exposed to different loading and support conditions.
Before deciding the screw pattern, confirm the following:
Installation area | What must be checked |
Wall | Stud layout, board orientation, joints and approved fixing centres |
Ceiling | Joist or channel layout, overhead support and ceiling fixing pattern |
Board edges | Required edge distance and joint-fixing arrangement |
Board field | Fixing centres across the supported central area |
Wooden framing | Compatible coarse-thread screw and suitable timber engagement |
Metal framing | Compatible fine-thread or approved metal-framing screw |
Multiple layers | Screw length and fixing pattern required for each layer |
Final selection | Board manufacturer instructions and project specification |
Important: Screw spacing should not be guessed or copied from another project. Always verify the approved installation system before work begins.
Why Drywall Screw Spacing Matters
Drywall screws do more than hold a board temporarily during installation. Each fixing point helps maintain contact between the gypsum board and the supporting stud, joist, channel or furring member.
Correct spacing can help:
• Keep board edges properly supported
• Maintain consistent board-to-frame contact
• Reduce movement between fixing points
• Support a flatter finished surface
• Reduce loose or raised board areas
• Improve the stability of walls and ceilings
• Make inspection easier before joint treatment
If screws are spaced too far apart, larger areas of the board may remain unsupported between fixing points. This can increase the possibility of movement, loose sections or visible finishing defects.
Installing excessive screws is not automatically better. Unnecessary or poorly positioned fixings can increase installation time and may cause:
• Torn paper facing
• Overdriven screw heads
• Damaged board edges
• Missed studs
• Split timber
• Stripped metal framing
• Crowded fixing points
The objective is not to install the maximum number of screws. The objective is to follow a controlled and approved fixing pattern.
Drywall Screw Spacing for Walls
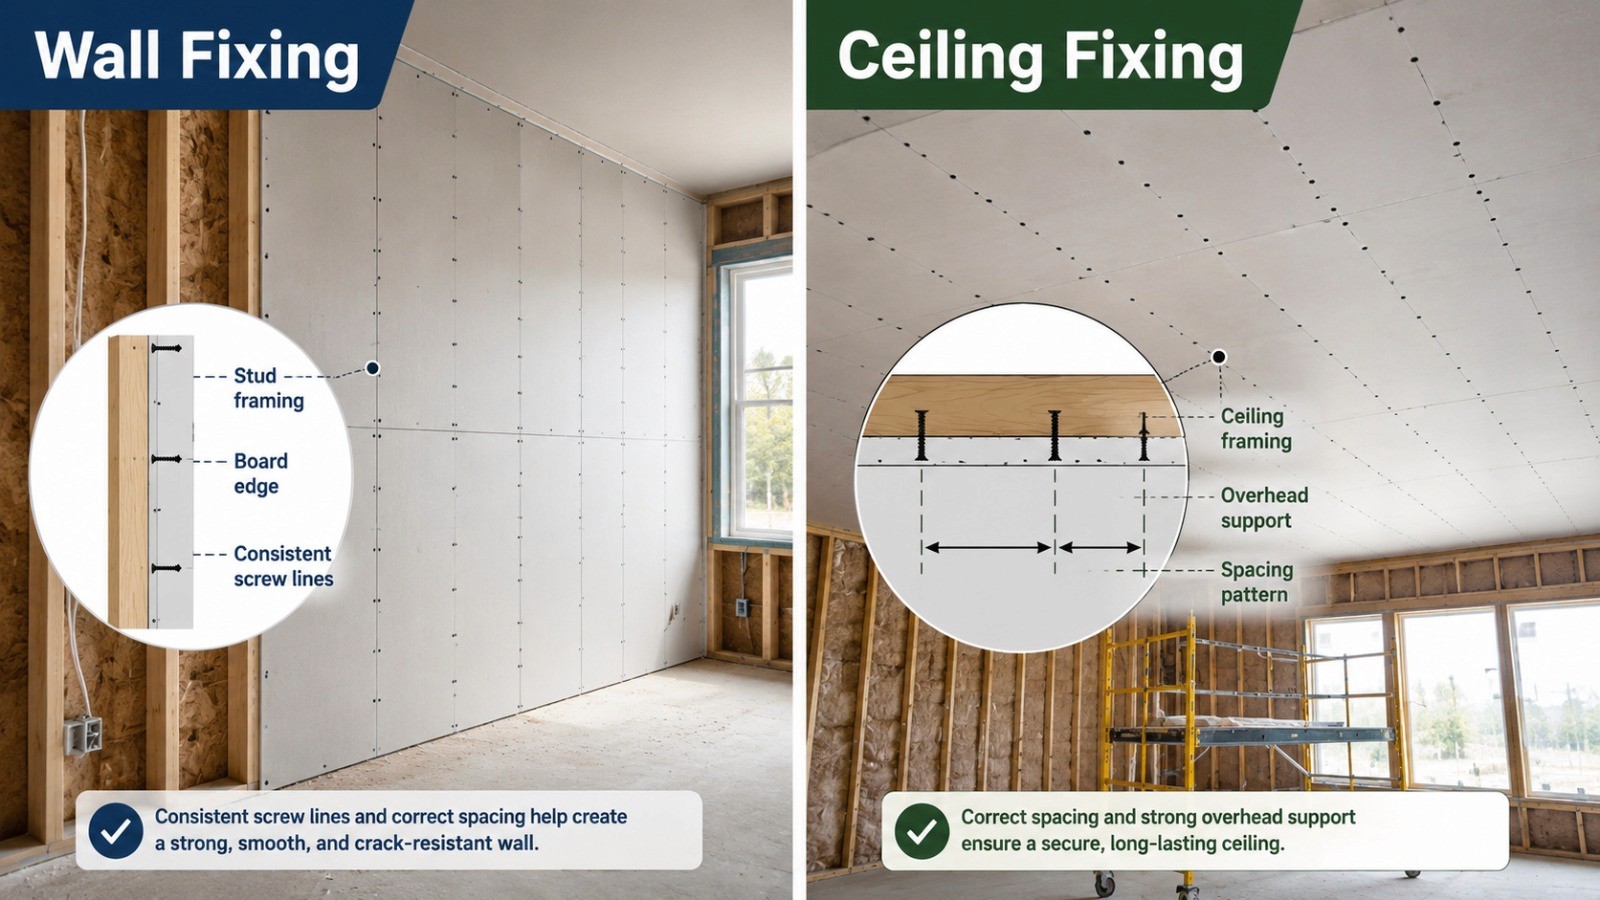
For wall installations, screws are generally driven along the studs or supporting framing members behind the gypsum board.
Before fastening begins, identify:
1. Every stud position
2. Board-edge locations
3. Horizontal and vertical joints
4. Board orientation
5. Required fixing centres
6. Correct screw type
7. Correct screw length
8. Number of board layers
Keep the fixing line centred on the stud
Each screw must enter the supporting framing member.
A screw that misses the stud may:
• Continue spinning
• Fail to tighten
• Leave the board loose
• Damage the board surface
• Create an unreliable fixing point
Stud positions should be marked clearly before the board is lifted into place. Straight fixing lines also make the finished installation easier to inspect.
For timber framing, installers can refer to the guide on coarse-thread drywall screws for wooden studs.
Follow a consistent fixing sequence
Wall screws should not be placed randomly.
A planned installation sequence helps produce:
• Straight screw lines
• Consistent fixing centres
• Better board contact
• Fewer missed studs
• Faster inspection
• More uniform finishing
Position and support the board first. Then install the screws according to the approved wall-system pattern.
Drywall Screw Spacing for Ceilings
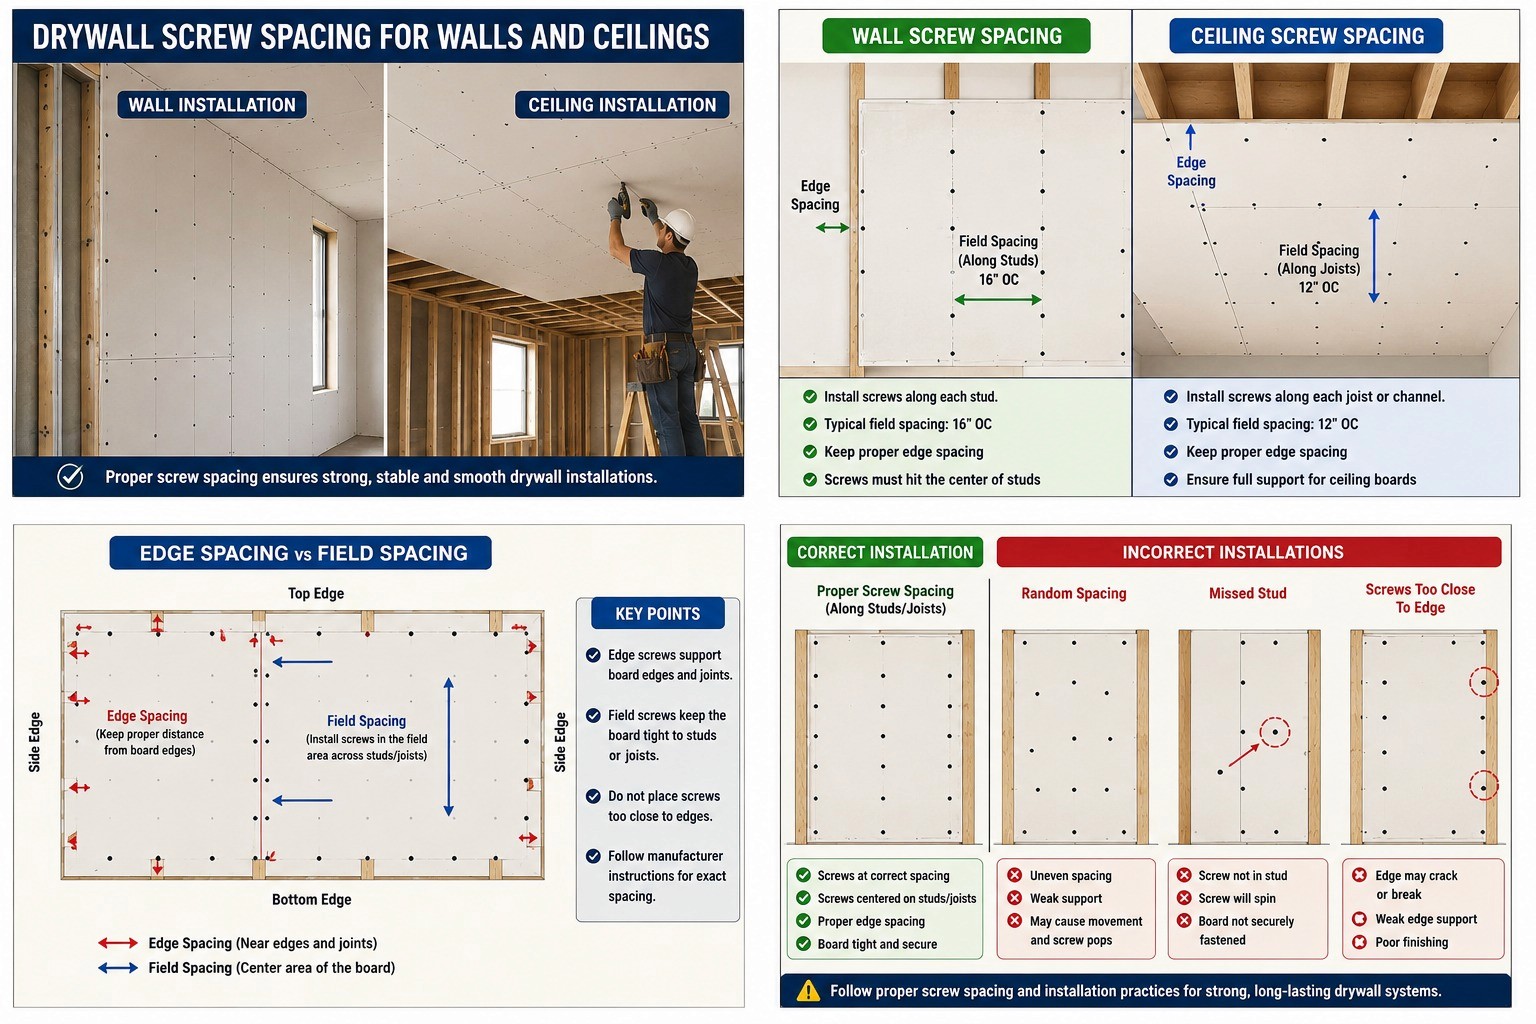
Ceiling drywall should be planned separately from wall drywall.
A fixing pattern used on a wall should not automatically be copied onto a ceiling. Ceiling boards remain overhead and may use different:
• Framing layouts
• Joist spacing
• Furring channels
• Board orientation
• Perimeter fixing
• Field fixing
• Support requirements
Before installing ceiling boards, confirm:
• Joist, batten or channel positions
• Board thickness
• Board direction
• Approved ceiling fixing centres
• Edge and field fixing requirements
• Correct screw type
• Correct screw length
• Number of board layers
• Temporary board-support method
Keep the board firmly against the framing
The board should be held tightly against the joist or channel while screws are installed.
If a gap remains between the board and framing, a screw may pull only one small area tight while the surrounding board remains unsupported.
This may result in:
• Uneven board surfaces
• Loose areas
• Board movement
• Visible joint defects
• Later screw pops
The board should remain supported until enough approved fixing points have been installed to hold it securely.
Check the ceiling system separately
Even an experienced wall installer should review the selected ceiling-system instructions before starting.
Timber joists, metal channels and suspended ceiling systems may all require different fixing arrangements.
Edge Spacing vs Field Spacing
Drywall screw spacing can differ between board edges and the central field area.
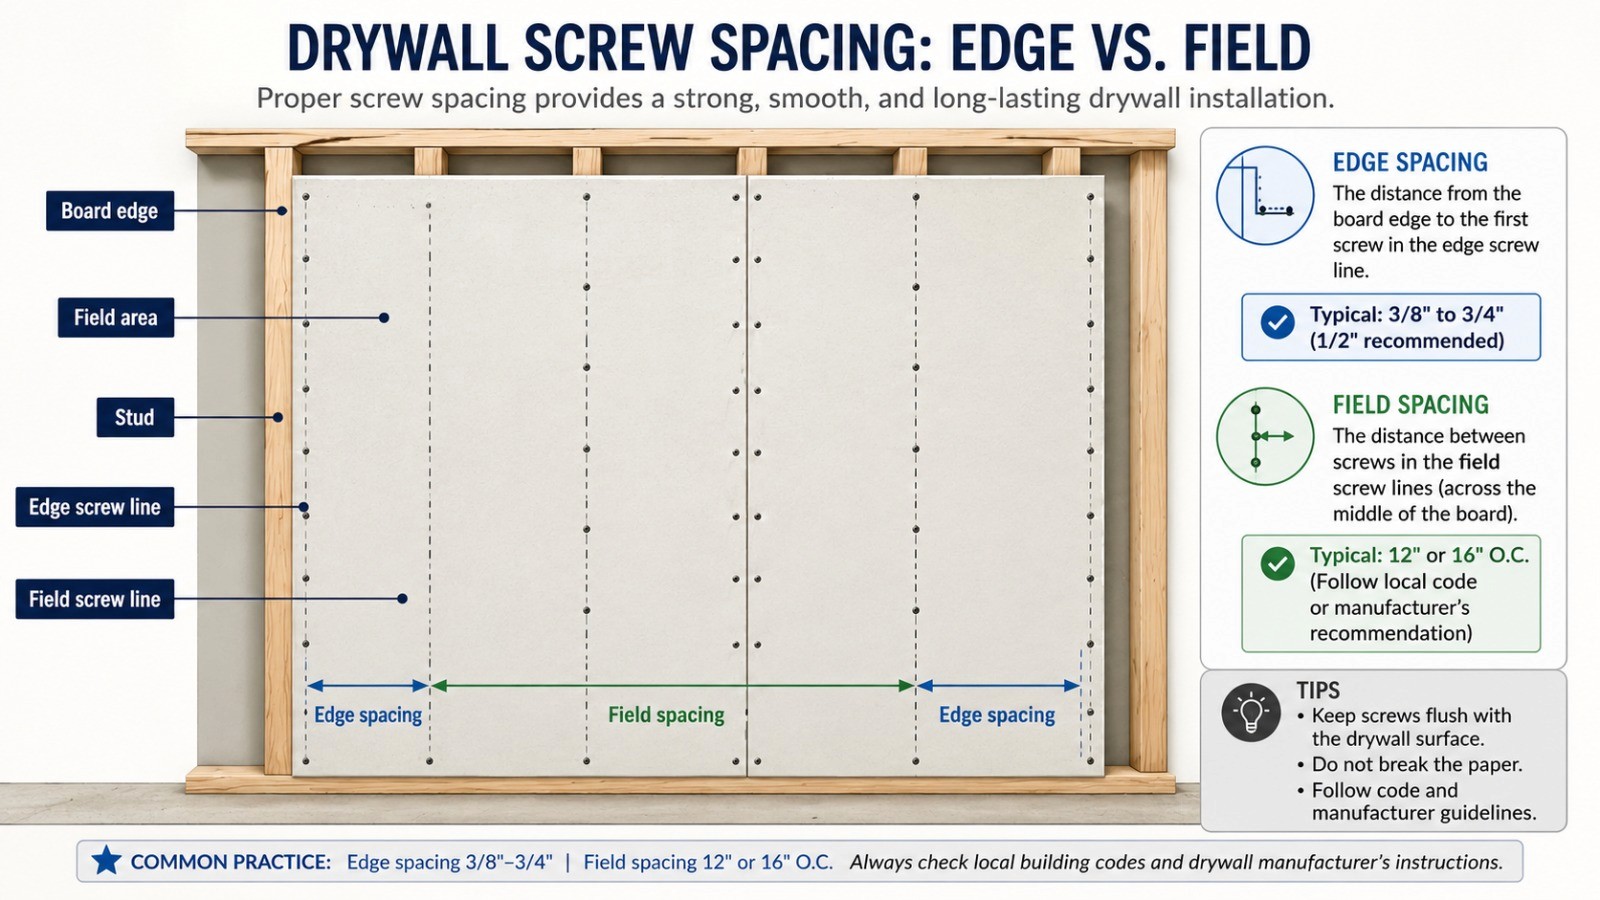
What is edge fixing?
Edge fixing refers to screws installed near:
• Board perimeters
• Vertical joints
• Horizontal joints
• Corners
• Openings
• Abutting board edges
Board edges and joints require careful support because movement in these areas can affect joint treatment and the final surface finish.
What is field fixing?
Field fixing refers to screws installed across the centre area of the board where it crosses intermediate studs, joists or channels.
Field fixings help keep the middle of the board in close contact with the framing.
Avoid screws too close to the board edge
A screw installed too close to the edge may damage the gypsum core or break the paper facing.
Possible problems include:
• Cracked board edges
• Broken corners
• Torn paper
• Weak fixing points
• Difficult joint finishing
The required edge distance should follow the approved gypsum-board system.
Avoid crowded joint fixings
Several screws crowded into a small area do not necessarily improve strength. Excessive fixing may weaken the board edge instead.
Joint screws should be placed carefully so that both the board edge and the adjacent sheet remain properly supported.
Drywall Screw Spacing on Wooden Studs
Coarse-thread drywall screws are generally used with suitable wooden studs because their deeper threads engage the timber fibres.
Before installation, inspect the timber for:
• Splits
• Twisting
• Moisture
• Damaged edges
• Existing stripped holes
• Narrow fixing surfaces
• Poor alignment
Screws should be driven into the central area of the stud wherever possible.
Driving close to a timber edge may contribute to splitting, especially when several screws are concentrated in one area.
The framing should also be dry and stable before the gypsum board is installed. Wet or unstable timber may move as it dries, contributing to board movement and screw pops.
Drywall Screw Spacing on Metal Studs
Coarse-thread drywall screws are generally used with compatible light-gauge metal framing.
The screw must penetrate and engage the metal stud correctly. A screw that does not engage the metal may continue spinning without tightening.
Before installation, confirm:
• Metal-stud thickness
• Suitable thread type
• Screw point type
• Required penetration
• Board thickness
• Approved fixing centres
Some thicker metal applications may require a drill-point screw rather than a standard sharp-point drywall screw. Selection should be confirmed against the framing and board-system specification.
For additional product-selection guidance, refer to the comparison of fine-thread vs coarse-thread drywall screws.
Single-Layer vs Double-Layer Drywall
Single-layer and multi-layer drywall systems may require different screw lengths and fixing patterns.
Single-layer drywall
In a single-layer installation, the board is fixed directly to the framing.
The installer should confirm:
• Correct screw length
• Wall or ceiling application
• Required edge fixing
• Required field fixing
• Board orientation
• Framing type
Double-layer drywall
In a double-layer system, the outer board must be fixed through the first board layer and into the supporting frame, or installed according to the approved system design.
This can affect:
• Screw length
• Screw location
• Joint arrangement
• Edge fixing
• Field fixing
• Staggering of board joints
The outer layer should not automatically copy the fixing pattern of the first layer unless the approved installation system requires it.
Each layer should be treated as part of the complete tested or specified wall or ceiling assembly.
How Board Orientation Affects Screw Placement
Gypsum boards may be installed horizontally or vertically depending on the system design.
Board orientation affects:
• Joint positions
• Framing intersections
• Edge support
• Screw-line direction
• Number of fixing points
• Installation sequence
Before fastening begins, confirm that every required board edge is properly supported.
Unsupported board edges may move even when the central area is correctly fixed.
Additional framing or backing may also be required around:
• Corners
• Door openings
• Window openings
• Service penetrations
• Board transitions
• Access panels
Common Drywall Screw Spacing Mistakes
1. Using one spacing pattern for every project
A fixing pattern suitable for one wall may not be suitable for another wall, ceiling or multi-layer system.
Always verify the approved installation requirements.
2. Copying wall spacing onto a ceiling
Ceilings may require a different fixing pattern due to overhead loading, framing layout and board orientation.
Wall experience should not replace the ceiling-system specification.
3. Placing screws randomly
Random fixing creates uneven centres and makes inspection difficult.
Mark the framing and follow a controlled sequence.
4. Missing the stud, joist or channel
A screw that misses the framing does not provide a reliable fixing point.
Remove it, locate the frame and install a replacement in an approved nearby position.
5. Installing screws too close to board edges
This may crack the gypsum core, tear the paper or weaken the board edge.
Maintain the required edge distance.
6. Leaving excessive gaps between screws
Large gaps can allow board movement or poor contact with the framing.
Follow the approved fixing centres.
7. Adding unnecessary extra screws
Additional screws do not automatically improve the installation.
Excessive fixing can increase board damage, missed framing and overdriving.
8. Failing to support the board during fixing
If the board is not held firmly against the frame, gaps may remain behind it.
Support the board until it is securely fastened.
9. Using the wrong screw type
Coarse-thread and fine-thread screws are designed for different framing applications.
Match the screw to the framing material.
10. Applying joint compound before inspection
Spacing and fixing problems are easier to correct before finishing begins.
Inspect the entire installation first.
For more examples, refer to the guide covering common coarse-thread drywall screw mistakes.
How Incorrect Spacing Can Contribute to Screw Pops
A screw pop occurs when the screw head or the surrounding board surface becomes visible after finishing.
Screw pops can be associated with:
• Board movement
• Framing movement
• Missed studs
• Loose fixing points
• Incorrect driving depth
• Gaps behind the board
• Wet or unstable timber
• Poor screw placement
Incorrect spacing is not always the only cause. However, an irregular or insufficient fixing pattern can allow more movement between the board and framing.
This movement may place additional stress around individual screw heads.
To reduce the risk:
• Follow the approved fixing pattern
• Keep the board tight against the framing
• Use the correct screw type and length
• Drive drywall screws to the correct depth
• Replace missed or spinning screws
• Inspect the framing before installation
• Correct defective fixings before finishing
Correct Drywall Screw Driving Depth
Spacing alone does not produce a secure installation. Every drywall screw must also be driven to the correct depth.
The drywall screw head should create a shallow recess below the board surface without tearing the paper facing.
Overdriven screw
An overdriven screw breaks through the paper and enters too deeply into the gypsum core.
This can weaken the fixing point.
Underdriven screw
An underdriven screw remains above the board surface.
This may interfere with joint compound and create a visible raised area after finishing.
Correct result
A properly driven screw should:
• Sit slightly below the board surface
• Leave the surrounding paper intact
• Hold the board firmly against the frame
• Avoid spinning
• Remain suitable for joint treatment
How to Maintain Consistent Drywall Screw Spacing
A simple installation process can improve accuracy and consistency.
Step 1: Review the specification
Check the board manufacturer’s instructions, project drawings and applicable construction requirements.
Step 2: Identify the framing
Mark every stud, joist or channel before positioning the board.
Step 3: Confirm edge support
Ensure that all required board edges and joints have suitable backing.
Step 4: Check the board layout
Confirm orientation, joint locations and openings before fastening.
Step 5: Position the board correctly
Align the board and hold it tightly against the framing.
Step 6: Follow a consistent sequence
Work in an organised direction instead of placing screws randomly.
Step 7: Check screw engagement
Confirm that each drywall screw enters and grips the framing member.
Step 8: Check driving depth
Make sure the drywall screw head is slightly recessed without damaging the paper.
Step 9: Inspect the complete board
Look for missed framing, spinning screws, damaged edges, raised heads and irregular spacing.
Drywall Screw Installation Checklist
Before joint treatment begins, confirm:
• The correct drywall screw type was selected
• Drywall Screw length suits the board system
• Studs, joists or channels were identified
• Wall and ceiling requirements were checked separately
• Drywall Screw lines are straight and consistent
• Edge and field fixing follow the approved pattern
• Board edges remain undamaged
• Every screw engages the framing
• No drywall screws continue spinning
• drywall Screw heads are slightly recessed
• Paper facing remains intact
• The board sits firmly against the frame
• Multi-layer requirements were followed
• Defective fixings were corrected
• The completed surface was inspected before finishing
Frequently Asked Questions
How far apart should drywall screws be?
The correct distance depends on the wall or ceiling system, board thickness, framing layout, board orientation and applicable installation requirements. Follow the approved board-manufacturer instructions rather than relying on one universal measurement.
Is ceiling screw spacing different from wall spacing?
It can be. Ceiling boards remain overhead and may require a different fixing pattern. Always check the approved ceiling-system requirements separately.
Should screws be closer together at board edges?
Edge and field fixing requirements may differ. The correct pattern depends on the approved board system. Screws should not be installed so close to the edge that they damage the gypsum core or paper facing.
Can I install extra screws for more strength?
More screws are not automatically better. Unnecessary fixing can increase board damage, missed framing and overdriving. Follow the specified fixing pattern.
What happens if drywall screws are too far apart?
Excessive gaps between fixing points may allow board movement, loose areas and inconsistent contact with the framing.
What should I do when a screw misses the stud?
Remove the defective screw, identify the framing position and install a replacement in an approved nearby location. Do not cover a loose or spinning screw with joint compound.
Which drywall screw should be used for wooden studs?
Coarse-thread drywall screws are generally used with suitable wooden studs because their deeper threads engage timber fibres.
Which drywall screw should be used for metal studs?
Fine-thread drywall screws are generally used with compatible light-gauge metal framing. Thicker metal may require a different point type.
Does double-layer drywall need different spacing?
A multi-layer system may require different screw lengths, joint positions and fixing arrangements. Follow the approved system instructions for each layer.
Can incorrect spacing cause screw pops?
Incorrect spacing may contribute to board movement and stress around screw heads. Screw pops can also result from missed framing, poor driving depth, gaps behind the board and framing movement.
Final Takeaway
Correct drywall screw spacing for walls and ceilings must be planned according to the complete installation system.
Before fixing gypsum board, confirm:
• Wall or ceiling application
• Board type and thickness
• Wood or metal framing
• Stud, joist or channel layout
• Board orientation
• Edge and field fixing requirements
• Single-layer or multi-layer construction
• Approved manufacturer instructions
• Applicable project requirements
A successful installation uses the correct drywall screw, places each fixing into sound framing, keeps the board tight against its support and maintains a consistent fixing pattern.
Careful spacing, correct driving depth and thorough inspection can help create stronger walls, more stable ceilings and a smoother finished surface.
Looking for reliable drywall screws for your next project or bulk requirement?
🟨 Request Bulk Quote
📘 Download Product Catalogue
📦 Explore Our Product Range
📞 Talk to Our Sales Team